Showing posts with label wedding decor. Show all posts

Wednesday, March 5, 2014

DIY: Recycled Bottle Centerpieces


Good morning, friends!

A whiiile back I shared a post that will make you feel like a badass DIY diva for completing. It's called DIY: Breaking Bottles with FireNow just imagine all the possibilities of broken bottles (that sounds strange).

I used various shades of blue and green bottles for my wedding table centerpieces. They fit the peacock theme perfectly :)

Materials/supplies
- broken bottles
- fabric
- ribbon
- glue (tacky or hot glue)

Putting It Together
Measure the diameter of the bottle and cut 1 1/2 inch thick fabric. Glue from the outside and over to the inner part of the bottle to create a finished-look. Then tie on a pretty ribbon to complete the decoration.

Start saving up those wine bottles, ladies, and get crafty!


What would YOU do with these bottles?


Linking up with lovely Nicole with Treat Yo' Self :)

Treasure Tromp

Signature photo Signature_zpsabfa935f.png

Sunday, July 14, 2013

DIY: Paper Lantern Lights (+ giveaway link-up)


Hello lovelies! Before the DIY project, I'd like to share a great giveaway opportunity my friend Leia is hosting, over at Latitue Adjustment. Sign up and maybe you'll win a pair of some snazzy glasses or shades...Definitely check it out!


DIY: Paper Lantern Lights

While you're here be sure to check out other my other wedding decor craft projects ~ wine wine bottle vases and tin can table lanterns!
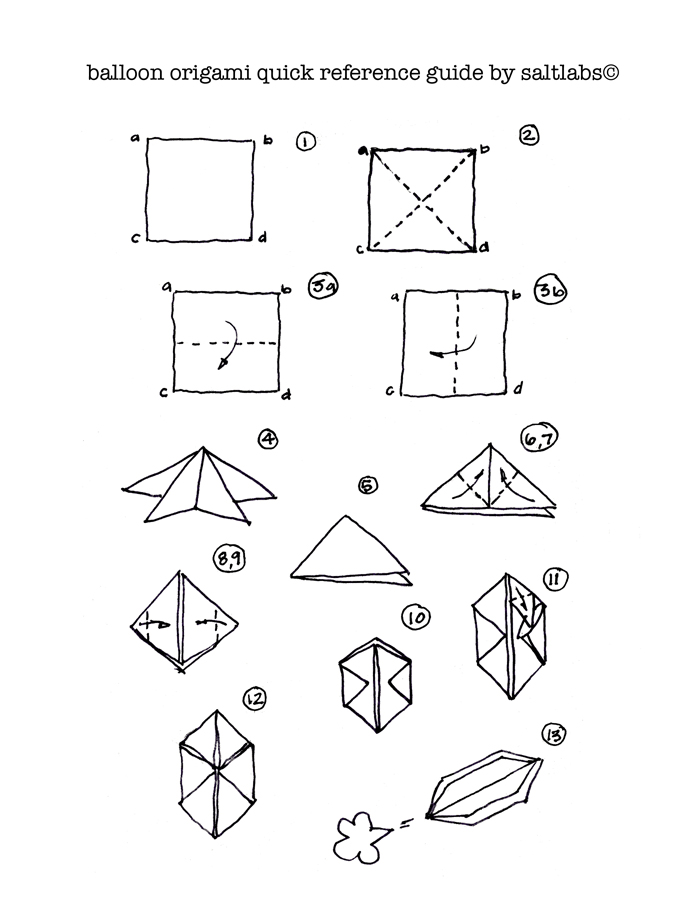
My vision with this project was to use Christmas lights for lighting and decoration, but with an added element. This project was perfect! To make these little lanterns, I referenced the blog Poppytalk because it has an easy and visual instructable. 

Prepping tips:
* I used paper a bit thicker than tissue paper. It seems paper should be thin so that the lights will shine through and still be bright. Newspaper would also be a cool effect!

* Use desired colors. Mine were purple and white.

* My cubes turned out about 1 1/2in. x 1 1/2in. Original paper was measured 15cm x 15cm.

* If you need to make a lot, throw a little lantern-making party with some friends! I'm so thankful for all the help I received because they got done so much faster.

Making the lanterns:
* Essentially your lanterns will be balloon origami! Here are the steps:
(www.poppytalk.com)
After:
* You'll blow up the balloons and slip the open end over the light bulbs. 
* I recommend doing this after the lights are already hung. It's much easier because they will fall off if moved a lot.
* I ended up having so many Christmas lights hung, that I didn't put lanterns on all of the bulbs. But the effect is still apparent and sets a whimsical mood :) 

And the final product looks like this!
(www.poppytalk.com)

Thanks for joining me. Isn't this DIY fun and easy!?

Saturday, April 27, 2013

DIY: Tin Can Lanterns


So I'm on such a recycled art kick, it's not even funny. This new project is inspired as wedding DIY #2 for lighting and decor. I saw the idea of tin can lanterns at a friends house and started browsing some tutorials and blogs. I found a tutorial by Erin at Rookie, with a great description and photos. Above is how some of ours turned out. Now go make your own!

Materials:
- hammer
- tin cans
- nails (different sizes)
- towel
- freezer
- water

Here's how!
1.  Cut off tops of cans and clean out really well (with hot water).

2. Make sure the edges are smooth and bent in.

3. Soak in hot water for a few moments and peel off label.

4. Fill with water and set in freezer overnight.

5. Now your ready to hammer away! Use different size nails for your designs. And you can work and kneel on the towel. 
6. Defrost or melt the ice from the cans.

7. Light your candles and enjoy your homemade lantern.


Tips:
- The more holes, the more light will shine out. My favorites were the ones with lots of holes.
- I also like Erin's idea to wear gloves :)
- You can design your pattern beforehand by making a template, like show at Inhabitat.

Optional additional steps:
- Create handles for your lanterns. First hammer 2 holes across from each other at the top of the cans. Then cut a hanger or wire as long as you'd like your lantern to hang. Attach wire through holes and bend the ends using pliers.  
- Paint the outside of the lanterns to add another element of decoration. 


I hope you enjoy this project. It was really fun hammering and making these with friends (and keeping my boyfriend up at night). Thanks for tuning in!


Here's another tin can lantern project I want to try :
Photo from My Upcycled Life

Friday, March 22, 2013

DIY: Break Bottles with Fire


From wine bottles to crafty jars!
Tah-dah!

I’ve tried something similar using a friend’s glass cutter. It worked alright but I haven’t been able to try more bottles since I don’t have a cutter myself. I was thrilled to stumble upon a blog with a different and simple technique for DIY breaking bottles.

I followed the blog fairly closely and began having more success after a few tries and adjustments. Don’t give up, it definitely takes some practice! Here are some tips to help:

Supplies
 -Try different materials. At first I was using thin yarn and switched to thicker, which seemed to be better. Also, shoelaces have worked for others. 
-Wrap yarn around bottle at least 5 times. 
-Instead of taking of the string, dipping in acetone, then putting it back on the bottle – keep the string on the bottle and slowly pour acetone on it (it will soak up more). 
- Light the flame, circling it around until it goes out. Then (AFTER flame is out), pour on more acetone and repeat flame process. This makes sure it’s REALLY hot and will crack 
- Another tip that was helpful in blogger’s review was to directly put bottle in ice cold water NECK first. I switched from using a shallow bucket to a blender (it sounds funny, but I think it helped).
1st try on right...practice, practice!
These are my first crafty endeavor for my wedding! These bottles will be part of the centerpiece...I'll post some pictures of the finished pieces.

Ideas of what DIY to fill them with?? Rocks? Origami stars? Hmm...