Showing posts with label crafts. Show all posts

Thursday, March 27, 2014

Hello Spring!


In the spirit of spring, here's a few things I've been up to! 

DIY! Use acrylic or spray paint to decorate up some plain shades. Then paint a sealant over it. I used Modge Podge and it should be a-ok with no rain.


Start planting when the frost is gone (sorry East Coasters!). I love rainbow chard for its beautiful, vibrant colors. I'm beginning them as sprouts, until they grow an inch or so, then will transplant to a bigger space. 


I'm also looking forward to wearing some dresses :) What do you love about spring?


Linking up with Nicole:

Treasure Tromp

Signature photo Signature_zpsabfa935f.png

Saturday, January 4, 2014

DIY: Fingerless Gloves {+ 24 Things update}


 Happy beautiful morning. I'm happy to be enjoying the redwoods with my parents for a few days. Nothing like waking up to sun peeking through the leaves, surrounded by nature, and hearing pitter-patter of a little bird dancing on the roof. 

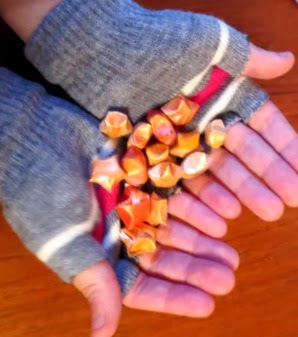
I have an awesome and ridiculously simple DIY project. Fingerless gloves! I love mine and have made several pairs. You know those gloves you can buy for like $1? Those, a pen, scissors, and matches are all you need!


Get your materials:

Gloves  +  pen  +  scissors  +  matches   


Cut off most of the fingers, leaving 1/4 remaining. Draw a line before if you need to. 


Then, carefully burn the edges to seal so they won't unravel.


Decorate by sewing on buttons or beads if you'd like.
Dah dah dah!


Easy peasy right? If you're feeling crafty, check out some more DIYs!

*   *   *


Update #1 on the 24 Things Challenge. If you missed what it's about it's basically purging and not buying any unnecessary things for 24 days, Jan. 1st-24th {more here}. 

In the past few days I've been sifting through a lot of things. I came to terms with my childhood stuffed animals and only kept a handful that were in the chest. The memories are always in my mind but I don't want to keep every little thing. Some I gave to my little cousins - they were thrilled - and the rest I'll donate this next week.

I also decided to let go of the possibility of using some things again some day. My old wooden fish tank stand has been in my room, occupied by fishy friends for nearly 10 years but I held onto the idea I would have fish again one day. But I was able to reason and let go of that. I could always get another one, if that time comes.

 There wasn't much hesitation in my scouring. The fact that I'm doing the challenge and want to cleanse from extra things was great inspiration to do it (and that my things are taking over my old room in my parents' house too)! It feels so good to clear out space.

If you're on board with the challenge, how's your experience? If not, what are your feeling towards 'stuff'?

Signature photo Signature_zpsabfa935f.png

Sunday, September 29, 2013

Stone Meditations


live simply. simply live.

Good day, lovelies! I hope you're enjoying your day so far - whether its spending time with loved ones, out exploring, catching up on housework, or just chilling at home. Before I head out to adventure around Barranco area of Lima, I want to share a little sweet something ...

I call it Stone Meditations. Basically, collect some smooth rocks and started writing inspiring messages or things you want to reflect on them. Here are some ideas I used and want to make:

~ all with love
~ live simply. simply live.
~ fly
~ gratitude
~ inspire
~ voice
~ do you
~ go girl (one of my favorites!)


I also tried a few techniques of writing on them. I used sharpie directly on the stones, tried using stamps, and also stamped on tissue paper and modge-podged it on. Have fun playing around with what you like.

Now you have your meditation stones :) You can use them as a mantra of what you want to bring into your life. Look at them and hold them once a day. Maybe even take a few minutes to sit with them, feel their weight, and let the message sink into you. Admire the beauty of their grounding nature. I keep my meditation stones with my plants, on an alter, and on the windowsill. 


If you like this, you can see some more Zen rocks at Chasing Happy, where I was re-inspired with this idea :) Thanks for stopping by and enjoy your Sunday!

Signature photo Signature_zpsabfa935f.png

Wednesday, August 28, 2013

DIY: Up-cycled Plastic Bags


Goodday sunshine! Today is already great because I'm stoked to share my second DIY vlog. [If you missed the first one, you can see here

I first did this project with a friend who found the wonderful idea. And I think it´s great and so simple, so I wanted to share. To up-cycle a bunch of plastic bags into a new creation...

Here´s what you´ll need:
  •  scissors
  • iron
  • 2-4 plastic bags (different colors, too!)
  • string or things for decorating
  • wax paper is best (or white paper, like I used)


What do you think? Any questions or comments, I´d love to see those comments! 
Signature photo Signature_zpsabfa935f.png

Sunday, July 14, 2013

DIY: Paper Lantern Lights (+ giveaway link-up)


Hello lovelies! Before the DIY project, I'd like to share a great giveaway opportunity my friend Leia is hosting, over at Latitue Adjustment. Sign up and maybe you'll win a pair of some snazzy glasses or shades...Definitely check it out!


DIY: Paper Lantern Lights

While you're here be sure to check out other my other wedding decor craft projects ~ wine wine bottle vases and tin can table lanterns!
My vision with this project was to use Christmas lights for lighting and decoration, but with an added element. This project was perfect! To make these little lanterns, I referenced the blog Poppytalk because it has an easy and visual instructable. 

Prepping tips:
* I used paper a bit thicker than tissue paper. It seems paper should be thin so that the lights will shine through and still be bright. Newspaper would also be a cool effect!

* Use desired colors. Mine were purple and white.

* My cubes turned out about 1 1/2in. x 1 1/2in. Original paper was measured 15cm x 15cm.

* If you need to make a lot, throw a little lantern-making party with some friends! I'm so thankful for all the help I received because they got done so much faster.

Making the lanterns:
* Essentially your lanterns will be balloon origami! Here are the steps:
(www.poppytalk.com)
After:
* You'll blow up the balloons and slip the open end over the light bulbs. 
* I recommend doing this after the lights are already hung. It's much easier because they will fall off if moved a lot.
* I ended up having so many Christmas lights hung, that I didn't put lanterns on all of the bulbs. But the effect is still apparent and sets a whimsical mood :) 

And the final product looks like this!
(www.poppytalk.com)

Thanks for joining me. Isn't this DIY fun and easy!?

Saturday, April 27, 2013

DIY: Tin Can Lanterns


So I'm on such a recycled art kick, it's not even funny. This new project is inspired as wedding DIY #2 for lighting and decor. I saw the idea of tin can lanterns at a friends house and started browsing some tutorials and blogs. I found a tutorial by Erin at Rookie, with a great description and photos. Above is how some of ours turned out. Now go make your own!

Materials:
- hammer
- tin cans
- nails (different sizes)
- towel
- freezer
- water

Here's how!
1.  Cut off tops of cans and clean out really well (with hot water).

2. Make sure the edges are smooth and bent in.

3. Soak in hot water for a few moments and peel off label.

4. Fill with water and set in freezer overnight.

5. Now your ready to hammer away! Use different size nails for your designs. And you can work and kneel on the towel. 
6. Defrost or melt the ice from the cans.

7. Light your candles and enjoy your homemade lantern.


Tips:
- The more holes, the more light will shine out. My favorites were the ones with lots of holes.
- I also like Erin's idea to wear gloves :)
- You can design your pattern beforehand by making a template, like show at Inhabitat.

Optional additional steps:
- Create handles for your lanterns. First hammer 2 holes across from each other at the top of the cans. Then cut a hanger or wire as long as you'd like your lantern to hang. Attach wire through holes and bend the ends using pliers.  
- Paint the outside of the lanterns to add another element of decoration. 


I hope you enjoy this project. It was really fun hammering and making these with friends (and keeping my boyfriend up at night). Thanks for tuning in!


Here's another tin can lantern project I want to try :
Photo from My Upcycled Life

Friday, March 22, 2013

DIY: Break Bottles with Fire


From wine bottles to crafty jars!
Tah-dah!

I’ve tried something similar using a friend’s glass cutter. It worked alright but I haven’t been able to try more bottles since I don’t have a cutter myself. I was thrilled to stumble upon a blog with a different and simple technique for DIY breaking bottles.

I followed the blog fairly closely and began having more success after a few tries and adjustments. Don’t give up, it definitely takes some practice! Here are some tips to help:

Supplies
 -Try different materials. At first I was using thin yarn and switched to thicker, which seemed to be better. Also, shoelaces have worked for others. 
-Wrap yarn around bottle at least 5 times. 
-Instead of taking of the string, dipping in acetone, then putting it back on the bottle – keep the string on the bottle and slowly pour acetone on it (it will soak up more). 
- Light the flame, circling it around until it goes out. Then (AFTER flame is out), pour on more acetone and repeat flame process. This makes sure it’s REALLY hot and will crack 
- Another tip that was helpful in blogger’s review was to directly put bottle in ice cold water NECK first. I switched from using a shallow bucket to a blender (it sounds funny, but I think it helped).
1st try on right...practice, practice!
These are my first crafty endeavor for my wedding! These bottles will be part of the centerpiece...I'll post some pictures of the finished pieces.

Ideas of what DIY to fill them with?? Rocks? Origami stars? Hmm...

Tuesday, December 25, 2012

DIY: Rock Wrapping for beginners


Hey all! I'm thrilled to have created my first legit jewelry video with the help of my boyfriend, Rafa. A big thanks to him for his video expertise (Cinergia Cusco).

If you want to wire-wrap rocks, sea glass, or any other object I hope this DIY helps. Please leave a comment, thanks for watching :)

Saturday, November 17, 2012

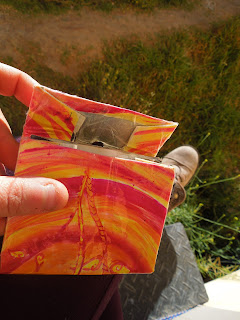
DIY: Recycled Crafty Wallet


I first saw this recycled project in Peru, where it seems to be a common thing. I´ve been making a bunch because I love the idea - fun, recycled, and easy! Here´s a little DIY so you can make your own. I hope it helps and you enjoy.

Materials
-1 litre milk/juice/wine carton
-paper/collage items (paint, brushes, markers, magazines, leaves, etc)
-scissors
-large, clear tape
-ruler
-thin elastic (between 0.5-1cm)
-pin (or something to make hole)

Ok....now you´re ready to go!


Step 1: Paint, collage, or decorate your paper. Or my friends like to use the original box if it has a neat pattern (like Gato wine). You can measure 26.5cm to cover one side of the box and both sides. Remember, if you have a design it should be planned out, as the folding will affect how it shows up. 


Step 2:
Cut the top and bottom off of the box.


Step 3:
Fold the sides in and crease.


Step 4
Cover box with designed paper and tape, sealing all corners. 


Step 5
Fold the carton off center by about 3-4cm. 
Then fold the longer side over again to create a flap. 


Step 6
Cut off the inner folded layers of the 
flap so that only the designed outside if left.


Step 7: Make a hole in the middle of the flap crease.


Step 8: Insert both endsof elastic and adjust to fit around the wallet.


Step 9: Double knot the ends together and cut extra elastic.


Step 10: Tape inside creases together on both sides.


Ta-daaa, that´s it!
Now you have your own unique, practical, and recycled wallet. 
There are lots of ways and techniques to use when making these. 
For example, you can also play with other methods of holding 
the wallet together (maybe a button or bead). 

Stay tuned for more DIY crafts.