Sunday, April 28, 2013

Expat Q&A: Seasons and All Their Glory


Hey all, happy Sunday! Today I'm doing my first link-up with The Hemborg Wife and Found Love, Now What?. It's a bi-monthly link-up called Expat to Expat Q&A, today's theme being weather and seasons where I'm living, in Peru. Here it goes...

A bit of my expat background: After studying abroad in Spain my junior year in college, I've got the travel bug. So I traveled to Peru, hoping to find work teaching English. I not only found that, but an amazing group of women and my love (and husband-to-be), Rafael. I've been living in Peru since October 2011, but am originally from California Bay Area. 
1. What was your favorite season back home and is it the same now; why or why not?
I love most seasons in California, but the one that sticks out right now is Autumn because of the beautiful colors and feelings that it bring. In Cusco, there are really just 2 seasons, dry and wet. I much rather prefer dry season, and it's not so cold around July-September.
2. Is there a place you would want to move to based solely on the weather?
Yes - a tropical jungle! I'd love to live in Thailand, Indonesia, or central Africa for awhile.
3. What is a piece an article of clothing that you had to buy for your new home due to the weather? i.e. galoshes, winter coat, etc
Boots, mittens, and a big down coat. And lots of layers, as it can go from a hot day to really chilly evening. 
4. Have you found the weather stereotypes of your new home to be true?
Well, I supposed that there would be more warm beaches. I was surprised to find out that each region has it's own weather because the geography is so varied. So it could be hot and humid in the jungle, cold and rainy in the mountains, and moderate on the coast at the same time.
5. Is there somewhere you would never live based solely on the weather?
Although I'm really attracted to Nordic countries because of their social care and pacifism, I don't think I could handle so few hours of daylight for too much time. I do really want to visit though!
6. What are you looking forward to most this spring?
Our wedding! It's going to be outdoors in a beautiful garden full of flowers. I'm looking forward to celebrating with friends and family. I'm also glad that the rain has let up and we can do more outdoor activities like hikes, picnics, etc.
7. Where you live, what is your go to outfit for spring?
Skirt, top, scarf, and a jacket for the evening.
8. What is one thing or event that you miss that happens back home at this time of the year?
My family has a lot of birthdays in April so I miss our celebrations, BBQs and live music.
9. If your hubs could bring home a bouquet of any type of flower, what you pick?
Orchids are very beautiful. Also, honeysuckles or jasmines because of their gorgeous smells. 


10. What does your perfect Saturday look like?
Making breakfast at home with my fiance and singing along with fun music, then a walk or little hike, followed by girls night crafting or chatting.
Bonus:  Are there any special holidays in your new country in the month of May?
Mother's Day is on May 12th this year. This day is hugely and commercially celebrated here, as mothers play a huge role in the family. Also, nearly every other day there is some celebration of a saint or religious procession.

Thanks for checking it out!


Saturday, April 27, 2013

DIY: Tin Can Lanterns


So I'm on such a recycled art kick, it's not even funny. This new project is inspired as wedding DIY #2 for lighting and decor. I saw the idea of tin can lanterns at a friends house and started browsing some tutorials and blogs. I found a tutorial by Erin at Rookie, with a great description and photos. Above is how some of ours turned out. Now go make your own!

Materials:
- hammer
- tin cans
- nails (different sizes)
- towel
- freezer
- water

Here's how!
1.  Cut off tops of cans and clean out really well (with hot water).

2. Make sure the edges are smooth and bent in.

3. Soak in hot water for a few moments and peel off label.

4. Fill with water and set in freezer overnight.

5. Now your ready to hammer away! Use different size nails for your designs. And you can work and kneel on the towel. 
6. Defrost or melt the ice from the cans.

7. Light your candles and enjoy your homemade lantern.


Tips:
- The more holes, the more light will shine out. My favorites were the ones with lots of holes.
- I also like Erin's idea to wear gloves :)
- You can design your pattern beforehand by making a template, like show at Inhabitat.

Optional additional steps:
- Create handles for your lanterns. First hammer 2 holes across from each other at the top of the cans. Then cut a hanger or wire as long as you'd like your lantern to hang. Attach wire through holes and bend the ends using pliers.  
- Paint the outside of the lanterns to add another element of decoration. 


I hope you enjoy this project. It was really fun hammering and making these with friends (and keeping my boyfriend up at night). Thanks for tuning in!


Here's another tin can lantern project I want to try :
Photo from My Upcycled Life

Thursday, April 25, 2013

Trip Tips: Salineras, Peru


Salt pans, Maras.

Salineras literally means "salt-makers" in Spanish. If you've never seen salt pans before and are in Peru, I really recommend this short day-trip. Here's how I did it and some recommendations. 

While my family was visiting, we did the obvious tourist activity - Machu Picchu. We took the train to Ollantaytambo and found a taxi driver who offered us a  reasonably priced tour to Moray - Salineras - Cusco (100soles or about $40). Apparently, there are quite a few taxi driver tour guides that do this route, as you can see on Leap Local

Moray

First we explored the archaeological Inkan terraces of Moray. Moray is an impressive and unique site because of its circular leveled formation, perfected as a farming technique. It was even more awesome because the entrance is only 10 soles and can be bought individual instead of having to buy the entire Tourist Ticket to all the ruins.


The view with all the pans.
Then we headed to Salineras, in the town of Maras. You can also access it on bus from Cusco to Urubamba, getting off at the cross road of Maras. From there, Salineras is down a winding road about 30 minutes and a low taxi fare. The entrance fee is very minimal, about 5 soles.


The salt looks like crystals!


Families in Maras have been maintaining the pans for many years and they date back to Inkan times. Now it is organized by an informal cooperative and whoever would like to can harvest and maintain a salt pan.
Talk about some amazing views ~


There are locals who sell bags of pure Maras salt, which I definitely bought.


It was nice to do a tour so we could learn about the process of the salt and history from a local primary source. You could also do some research (it's easily accessible) and prepare a self-tour. Or there's also bike tours, which would be really fun!


Saturday, April 20, 2013

Photographic Ode to Nature

* * *
I love photography. And I love plants. I love trying to recreate a moment and show the beautiful elements of nature. This post is a collection of the delicate intricacies nature shows us in places I've traveled or lived.

Most of the photos are taken and edited by me, but also thanks to Diane Patterson for the beautiful Choquequirao shots (when I didn't have my camera).

* * *

Peru
Cusco

Sacred San Pedro cactus.


My lotus succulent.
Flowers overlooking the city from Cristo Blanco.


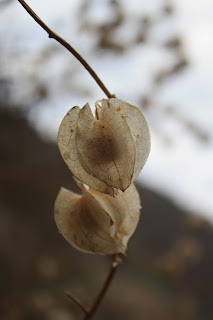
My favorite flower in Peru. When
they're on their tree they look like little lanterns.


Furry plants ?


Corn in all colors and varieties. 


Urubamba

Sunkissed.


Choquequirao 

Pricelessly captured. By Diane Patterson


Delicate little fruity lanterns, Aguaymanto.
 By Diane Patterson


Morning trek into the mist. By Diane Patterson


Puerto Maldonado

Sacred spirals.

Quillabamba


A ruffle tree!


Coffee beans preparing themselves.


I connected with this plant because I make jewelry in similar designs.


Cacao pod - mmm chocolate!
* * *

California

North Bay (Sonoma County)

Beautiful decay, Luter Burbanks Garden.

Mid-air splash, fountain in Chico.
Home plant.


Magnificent Oak.


Barnacles at Salmon Creek.

Berkeley
I liked this tree because it feels like it's on fire.


Peninsula Parks

My very favorite, the great Redwoods.


Treasures, lost and found.


He was looking like he wanted an acorn hat.
* * *


Costa Rica

Bamboo is such an incredibly strong yet flexible root. I was amazed how it grows and bows down like this.


Rainbow Eucalyptus! I edited the colors
a bit but it's not far off from the real effect.
* * *


Hawaii
Kona


This lava rock came from the island volcanoes
and covers the beaches, but careful - it's sharp!

Tiger orchids <3


* * *

I hope you enjoyed! Have you ever seen any of these natural beauties?
 Stay tuned for another Photographic Ode to Animals . . .


Saturday, April 6, 2013

A Cultural Bit: Guinea Pigs


A lovely appetizing leg and claws on your plate.
What's the strangest thing you've ever eaten? I would say mine is cuy (guinea pig). Although, in countries like Ecuador and Peru this is nothing strange at all. 
Cuyes are raised by many families here, especially out in the campo(farmland). For special events and celebration, like birthdays, it is common to eat cuy

Now it's also part of tourist activity and cuy can be found at many restaurants in the center. This can also be very pricey, as you can imagine. See tips below!

Cuy castle...the most impressive one I've seen!

The following article by Alastair Bland (NPR) is an interesting read about the ecological effects of raising cuyes. Here's his conclusion:

"There's a clear cultural prejudice against eating guinea pigs, and rodents in general, in the United States," Miller says. "But finding ways to reduce our carbon footprint is a good idea, and so is eating small livestock, like guinea pigs."

I recommend reading the whole article here: 
From Pets to Plates: Why More People Are Eating Guinea Pigs


Thoughts and Tips 
While I don't eat much meat, I didn't mind the taste of baked cuy. The skin is tough and rubbery but the meat on the inside is tender. It's such a small animal, so it doesn't have a whole lot of meat. Also, be warned that it's served with claws and head, as in the picture at the top. 

Taking my parents to try cuy...dad liked it but it turns out mom's not a fan.
Since cuy is part of the culture in the campo, my favorite experience was going to a birthday celebration with my roommate to the farm where her family lives. If you're going to try something new, might as well get as close to the authentic experience as possible. It would be even better if you can help prepare the meal to see the whole process!

If you really want to eat authentic cuy, I would suggest taking a bus a little outside of Cuzco to Tipon. They are known for their typical oven-baked cuy, served with pasta and potatoes. And it's much more fun to have that authentic cultural experience.

While in Ecuador, I was eager to try cuy so I found a market and asked around for it. There was a place that had it for a reasonable price but it was disappointing, to say the least. I'd recommend not looking for this delicacy at a market.

It's part of the culture here, and they usually want to share it. So try it out, ask questions! 

Would you try cuy? What's the strangest plate you've tried?                     

Friday, April 5, 2013

Recipe: Chickpea paddies


Wondering what you can do with chickpeas? This recipe is great for chickpea burgers, serve with bun or just by itself with a salad and some rice.

It's very simple and easy - the most time consuming part is soaking the chickpeas overnight.


Ingredients:
2 cups soaked or canned chickpeas
1/2 water
1/2 cup avocado
1 egg (or 2 egg whites)
1/3 cup finely chopped celery
3/4 cup bread crumbs
A few cloves of chopped garlic
A few pinches of salt, pepper and curry

1. Chickpeas, avocado, and water in blender/food processor. I blend them on low because I like having some texture.
2. Stir in celery, bread crumbs, egg, and herbs.
3. The mixture should mostly hold it's shape. If not, add some flour until it becomes a good consistency.
4. Take a small handful and pat into a patty, using a bit on flour on both sides.
5. Oil in a pan and cook it up.
6. Enjoy!

 I initially was thinking to make a sort of falafel and it turned into this! It turned into a very successful experiment. So try throwing something else in there too...Maybe sweet potatoes? Any other ideas?